Introduction
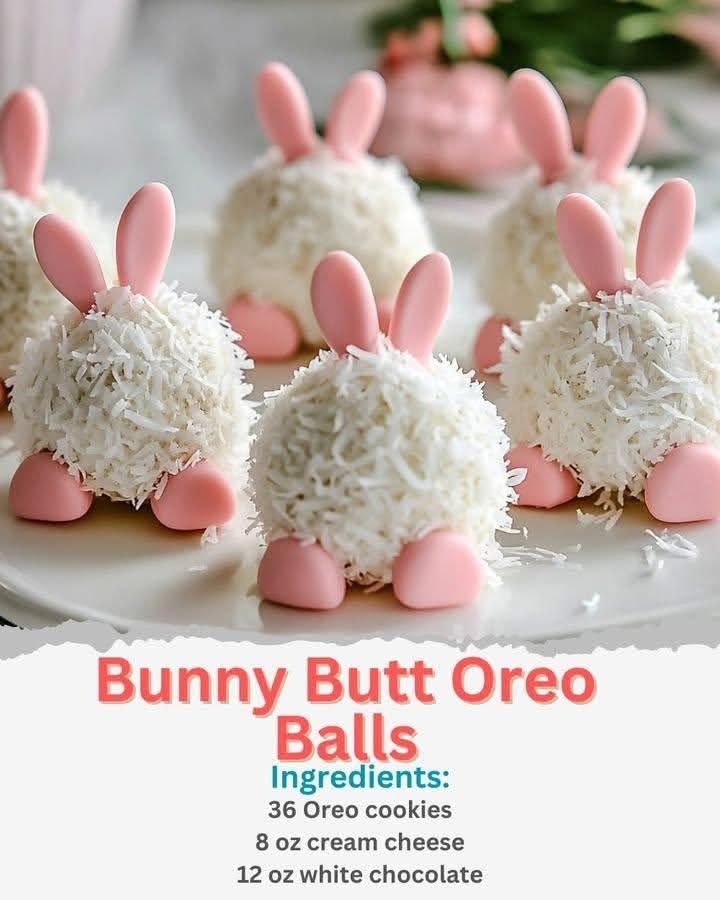
Bunny Butt Oreo Balls are an adorable, no-bake dessert that combines rich chocolate flavor with playful Easter charm. Creamy Oreo truffles are shaped into little bunny backsides, complete with tiny feet and fluffy tails, making them as delightful to look at as they are to eat. These treats are perfect for Easter celebrations, spring parties, kids’ events, or anytime you want a dessert that brings smiles before the first bite.
They’re simple, sweet, and irresistibly cute—proof that desserts can be fun and delicious at the same time.
A Brief History
Oreo balls (also known as Oreo truffles) became popular in the early 2000s as no-bake desserts made with crushed cookies and cream cheese. Their versatility made them ideal for holiday themes. Over time, creative home bakers transformed them into seasonal shapes—snowmen, pumpkins, reindeer, and eventually bunny butts.
The Bunny Butt version rose in popularity through Easter parties, bake sales, and social media, becoming a modern holiday classic rooted in simple ingredients and creative presentation.
Ingredients
Main Ingredients
- 36 Oreo cookies
- 8 oz (225 g) cream cheese, softened
- 12 oz white chocolate or candy melts (for coating)
Decorations
- Pink candy melts or pink frosting
- Mini marshmallows (for tails)
- Pink sprinkles or sanding sugar
- Black edible marker or melted chocolate (optional)
Instructions (Step-by-Step)
Step 1: Crush the Oreos
Place Oreos in a food processor and blend into fine crumbs. Alternatively, crush them in a sealed bag using a rolling pin.
Step 2: Mix Filling
In a bowl, combine Oreo crumbs and softened cream cheese. Mix until smooth and fully combined.
Step 3: Shape the Balls
Roll mixture into 1-inch balls. For bunny butts, make slightly larger balls for bodies and smaller ovals for feet if desired.
Step 4: Chill
Place balls on a parchment-lined tray and refrigerate for at least 30 minutes to firm up.
Step 5: Melt Chocolate
Melt white chocolate or candy melts according to package instructions until smooth.
Step 6: Coat
Dip each Oreo ball into melted chocolate, coating completely. Place back on parchment.
Step 7: Decorate
- Attach two small oval “feet” using melted chocolate
- Add pink paw pads with pink melts or frosting
- Press a mini marshmallow on top for the tail
- Sprinkle pink sugar for detail
Step 8: Set
Allow chocolate to harden at room temperature or refrigerate briefly.
Formation (Look, Texture & Flavor)
- Exterior: Smooth white chocolate shell
- Interior: Creamy, rich Oreo filling
- Flavor: Sweet, chocolatey, and lightly tangy
- Appearance: Cute bunny butts with fluffy tails and tiny feet
They’re soft inside with a satisfying chocolate snap outside.
Health Benefits (A Little Fun Perspective)
- Portion-controlled treats
- No baking required (less processed than many store desserts)
- Great for mental joy and celebration
- Encourages creativity and family bonding
- Can be made with reduced-sugar cookies if desired
Not a health food—but definitely a happiness food.
Different Methods & Variations
Chocolate Bunny Butts
Use milk or dark chocolate coating instead of white.
Vegan Method
Use dairy-free sandwich cookies, vegan cream cheese, and vegan chocolate.
Colorful Method
Tint white chocolate pastel shades for spring themes.
Cake Pop Method
Insert sticks to turn them into Bunny Butt pops.
Who Will Love These
- Kids (they’re obsessed)
- Easter party guests
- Bake sale shoppers
- Chocolate lovers
- Crafty bakers
- Anyone who loves cute food
Helpful Tips
- Chill balls well before dipping
- Use a fork or dipping tool for smooth coating
- Work in small batches to prevent melting
- Store in the fridge until serving
Conclusion
Bunny Butt Oreo Balls are more than just a dessert—they’re a conversation starter, a party highlight, and a guaranteed smile-maker. With minimal ingredients and endless charm, they bring fun, creativity, and sweetness to any celebration.
Cute, creamy, and completely irresistible—these little bunny butts hop straight into everyone’s heart.